Question 4: How did you integrate technologies – software, hardware and online – in this project?
I have learned so much at A level, unlike AS coursework, I actually improved my production skills as well as theoretical knowledge about hardware, software and online research. All these three elements work together, and in charge of different stages of our production!
And personally, I explored more about editing in Adobe Premiere CC and more about how to use a DSLR camera, which is an another step of being a filmmaker.
Talking about hardwares, a new camera Canon 60D with lens 24-105mm provides a better result of resolution and saturates the colour, and a new directional microphoneRODEoffers the possibility of getting the sound better, directly get the voice from the actor we want to hear:
PLUS it makes audio(dark blue diamond below) separately from video, which gives us a chance to manipulate the soundtrack when using editing program:
A clear image really saves us a lot of jobs for editing, such an amazing quality provides us a good base to start with, rather than wasting time on increasing sharpness, which even makes the image weird afterwards.
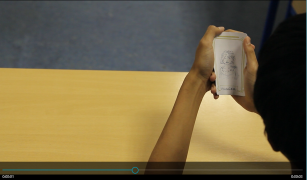
This is a good original clip, Graciela looks really pretty but it is too brightas the previous nights it looks dimmer, and editing program Adobe Premiere CC gives us a big help on lighting correction:
I did not use any corrections on my AS coursework, but this year I did integrate editing program and videos better, which makes the products from our hardware more useful by fixing it in software Adobo Premiere CC:
As you can see, the lighting is not as bright as before in edited one, although the colour goes off a bit, the overall lighting is dimmer and it is closer to other night scenes.
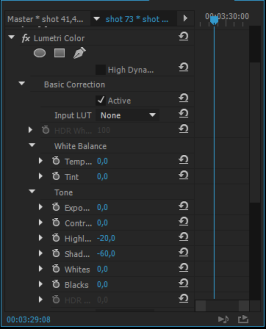
This is the very basic correction of lighting and it gives the effect sometimes the camera can not achieve. Basically, HIGHLIGHT section needs to be minus (-20) and SHADOW needs to be more (-60), which makes the picture seem to be darker.
Since DSLR camera requires the user to adjust the lens, otherwise, it might be out of focus and then you will get a blurry cliplike this:
My partner solved this problem by applying SHARPEN 50%:
And the software really fixes it, let us have a look at edited one:
Our post-production is much solid than AS coursework, tons of online researches fill in our brain and definitely help us construct the narrative and apply fancy effects while editing.
(Specific links for different uses will be provided later)
Surprisingly, we integrate hardware and online really wellthis year especially in split screen effects. Online research (CHECK OUT Split screen tutorial – get ready for editing!) gives me a lesson of how to use camera in a strategic way to get a suitable image for editing, and we discussed of which angle before filming:
This is the plan for shooting and Nass was in charge of this part so i need to illustrate what shots and angles I would like, therefore, hardware and software can integrate better. And this is the screenshots of original clips:
And after we got the sources we want, this part comes tosoftware and online, following the tutorial mentioned ealier, this is the final clip for it:
I did not aware ‘Crop’ can create split screen before, it is the core of this effect:
First, I applied this effect in the clip I want and go to effect controls to customize it. The part you crop out is the part you do not need. For example, the above is the data for the split screen I design to put on the right end, which means the LEFT needs to be 60% – 70%, this 60% will be take over by another two split screens. Technically, the RIGHT does not need to be cut but it would be neater if cut down 5% -10%.
(This is the one I design to put on the left end, opposite of the example of right end but the same logic)
After you finished the first one, the second clip can be on the middle, which means both of RIGHT and LEFT need to be cut, because the person in the original clip is filmed at the center of the image so it is easy to cut and position:
The hardest point of split screen is to put it in the right position so it does not look odd, which means only ‘Crop’ is not enough, my partner told me another basic function called ‘Motion’:
It basically moves the image around the screen, a blue frame locate the clip you want to move, and it gives a tiny space between each other after you move right or left:
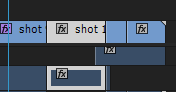
In the original three clips, they are shown one after another, and this one I want to shorten it and make it effective, it still appears one by one but they will end up in the same screen, and will be only focus on the part of hands holding the card, I added transparent video(pink) before each actual clip, then they have the same delay:
Personally, this part of split screen might be the most successful one, we should have done the discussion before shooting werewolf waking up as well since we also decided to create split screen effect. And I should have learned the tutorial before we started learning before filming the first split screen clips, therefore some would not end up so abrupt.
In Lovers part, one is zoomed in a bit, and another is not, which I ended up zoomed one to match another. It is harder to integrate with software in those clips even though we made it happen.
And I got the disappearing effect from a tutorial Editing try: Disappear effect by iMovie, which really helps me while I was filming, it tells me how to place camera and how to direct the actor:
hold the camera in the same position for 2s – let actors work in – sit down – record the still image of the actor sleeping for 2 s – done
deleted ‘work in’ parts and apply ‘Cross dissolve’
Beside offering the editing lessons, online also helps us to get music (CHECK OUT Music – get ready for editing! & Sound effects – Get ready for editing!). We did not record the soundtrack but find it online, and they are allroyalty free, which just save us a lot jobs. What we need to do is to download the music and move it to Adobe premiere CC. Without the music, the film would not be effective. And the transitions like ‘EXPECTIONAL FADE’ is useful, because it fades the sound slowly and keep the enigma:
In the process of integrating hardware and software, we had a problem because of the limitation of Adobe Premiere and my shaky hand. In my research (Different effects in stock – get ready for editing, I mentioned ‘Warp stabilizer’ and it is useful for shaky clips especially those pan shots but we also need to speed up those clip, and the problem is we can not apply ‘warp stabilizer’ and ‘speed’ at the same time.
To be honest, we should have hold the camera more steady so it would not end up so shaky, and it will integrate hardware with editing program better.
At A2 level, we did not change the online hub WordPress, and it is the integration of online, software, and hardware. Anything links to editing and videos are uploaded in the blog, even the way of recording our journey can not be seperate from theses three elements.
And we use WIX to create our website, which is the official hub for our film, and we did put the product of integration of hardware and software like edited bloopers (http://nassmaggie.wix.com/epiphany#!videos/cwzt)! Online is the way we communicate with our audience, without online, those bloopers can not be seen in the internet and it is the waste of hardware as well as my partner’s effort of editing.
Overall I am satisfied about the improvement I made and I will learn how to use After Effects in the university and how to hold the most important hardware Canon 60D steady!
We spent all day editing it and found a way to avoid watching teacher talking endlessly – change the form to bullet points on the white board! And it is still in a classroom and we could use teacher’s voice while bullet points appear.